오늘은 윈도우 환경에서 GPG 키를 생성하고 Github에 연동해보겠습니다.
Gpg4win 설치
위 사이트에서 gpg4win을 다운로드하고 설치해주세요.
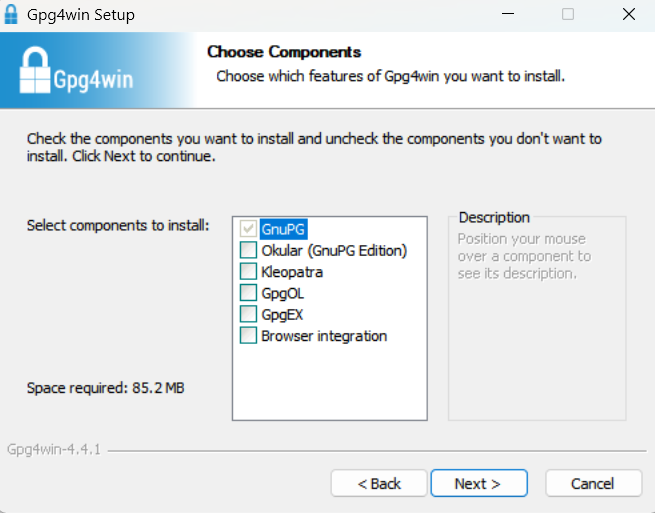
저는 가장 기본인 GnuPG만 설치하였습니다.
키 생성
설치가 완료되었다면 터미널을 열고 다음 명령어를 입력합니다.
gpg --full-generate-keygpg (GnuPG) 2.4.8; Copyright (C) 2025 g10 Code GmbH
This is free software: you are free to change and redistribute it.
There is NO WARRANTY, to the extent permitted by law.
Please select what kind of key you want:
(1) RSA and RSA
(2) DSA and Elgamal
(3) DSA (sign only)
(4) RSA (sign only)
(9) ECC (sign and encrypt) *default*
(10) ECC (sign only)
(14) Existing key from card
Your selection? 1암호화 방식을 선택해야 합니다. 저는 1번을 선택하였습니다.
RSA keys may be between 1024 and 4096 bits long.
What keysize do you want? (3072) 4096
Requested keysize is 4096 bits
키 길이를 4096 비트로 설정하였습니다.
Please specify how long the key should be valid.
         0 = key does not expire
      <n>  = key expires in n days
      <n>w = key expires in n weeks
      <n>m = key expires in n months
      <n>y = key expires in n years
Key is valid for? (0) 2y
Key expires at 09/23/27 23:35:42 ���ѹα� ǥ�ؽ�
Is this correct? (y/N) y
키의 유효기간 설정입니다. 저는 2년으로 설정하였습니다.
GnuPG needs to construct a user ID to identify your key.

Real name: JongMyeong HAN
Email address: [email protected]
Comment:
You selected this USER-ID:
    "JongMyeong HAN <[email protected]>"

Change (N)ame, (C)omment, (E)mail or (O)kay/(Q)uit? o
이름, 이메일과 코멘트를 입력한 후 입력한 사항이 맞는지 확인합니다.
We need to generate a lot of random bytes. It is a good idea to perform
some other action (type on the keyboard, move the mouse, utilize the
disks) during the prime generation; this gives the random number
generator a better chance to gain enough entropy.
랜덤 바이트를 얻기 위해서 마우스를 적당히 움직여주면 비밀번호를 설정할 수 있는 창이 나타납니다.
여기까지 수행했다면 성공적으로 키를 생성한 것입니다.
키 확인하기
gpg --list-keys --keyid-format long위 명령어를 입력하면 현재 컴퓨터의 키 리스트를 확인 할 수 있습니다.
gpg: checking the trustdb
gpg: marginals needed: 3  completes needed: 1  trust model: pgp
gpg: depth: 0  valid:   2  signed:   0  trust: 0-, 0q, 0n, 0m, 0f, 2u
gpg: next trustdb check due at 2027-09-14
[keyboxd]
---------
pub   rsa4096/200C539374F032EC 2025-09-23 [SC] [expires: 2027-09-23]
      3E8FC97AA403448F31455EC5200C539374F032EC
uid                 [ultimate] JongMyeong HAN <[email protected]>
sub   rsa4096/E80E3BA68793FBAD 2025-09-23 [E] [expires: 2027-09-23]
폐기 키 생성하기 및 내보내기
gpg --gen-revoke (키 ID) > (키_ID)_revoke.ascgpg --gen-revoke 200C539374F032EC > 200C539374F032EC_revoke.asc
sec rsa4096/200C539374F032EC 2025-09-23 JongMyeong HAN <[email protected]>
Create a revocation certificate for this key? (y/N) y
Please select the reason for the revocation:
0 = No reason specified
1 = Key has been compromised
2 = Key is superseded
3 = Key is no longer used
Q = Cancel
(Probably you want to select 1 here)
Your decision? 0
Enter an optional description; end it with an empty line:
>
Reason for revocation: No reason specified
(No description given)
Is this okay? (y/N) y
ASCII armored output forced.
Revocation certificate created.
Please move it to a medium which you can hide away; if Mallory gets
access to this certificate he can use it to make your key unusable.
It is smart to print this certificate and store it away, just in case
your media become unreadable. But have some caution: The print system of
your machine might store the data and make it available to others!내보낸 폐기키를 후에 서버에 업로드하게 되면 키가 폐기됩니다.
gpg --export --armor (키 ID) > (키 ID)_public.asc
gpg --export-secret-keys --armor (키 ID) > (키 ID)_private.asc
위 명령어로 공개키와 비밀키를 내보낼 수 있습니다.
키 업로드 하기(선택)
Github 연동을 위한 키 발급과는 관련이 없지만 서버에 키를 업로드 할 수 있습니다.
PS C:\Users\Administrator> gpg --keyserver hkps://keyserver.ubuntu.com --send-keys 200C539374F032EC
gpg: sending key 200C539374F032EC to hkps://keyserver.ubuntu.com
PS C:\Users\Administrator> gpg --keyserver hkps://keys.openpgp.org --send-keys 200C539374F032EC
gpg: sending key 200C539374F032EC to hkps://keys.openpgp.org
PS C:\Users\Administrator> gpg --keyserver hkps://keyserver.pgp.com --send-keys 200C539374F032EC
gpg: sending key 200C539374F032EC to hkps://keyserver.pgp.com
몇몇 유명 키서버에 키를 업로드하는 예시입니다.
일부 키서버는 이메일 인증을 요구하는데 이메일이 스팸 메일함에 있는 경우도 있으니 확인해보시는 것을 추천드립니다.
Git 설정하기
git config --global gpg.program "C:/Program Files (x86)/GnuPG/bin/gpg.exe"

git config --global user.signingkey (키 ID)

git config --global commit.gpgsign true
git config --global tag.gpgSign true
위 명령어를 차례로 입력하면 Git 설정이 완료됩니다.
Github 설정하기
https://github.com/settings/keys
Github 키 설정창에 접속합니다.
New GPG key를 누르고 위에서 내보낸 공개키 파일의 내용을 메모장으로 열어서 복붙해주면 됩니다.
이제 설정이 완료되었습니다!

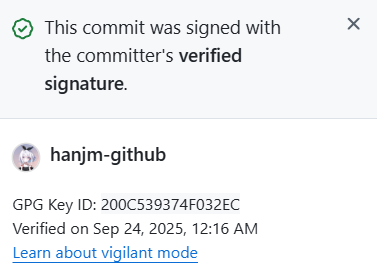
새로운 커밋을 하게 되면 Verified 문구와 함께 키 정보를 확인할 수 있습니다.
답글 남기기